
This page gives step-by-step instructions for how to use the ‘Touch Up Reading Order’ tool in Adobe Acrobat Pro XI to make an ACM publication in PDF format more usable for people with disabilities.
This is a supplement to the instructions for essential steps to an accessible ACM paper, and assumes the first 5 of those 6 steps have already been taken.
Steps
- Open the ‘Touch Up Reading Order’ tool
- Mark up tables
- Mark up text and figures
- Mark up headings and formulae
- Check reading order and fix problems
Step 1. Open the ‘Touch Up Reading Order’ tool
- Go to the ‘View’ menu.
- Select ‘Tools’
- Select ‘Accessibility’

- The accessibility tools will open in a panel on the right

- Select ‘Touch Up Reading Order’.

- The ‘Touch Up Reading order’ dialog will open.

… and the document view will be annotated with numbered markup items, showing the reading order.

Step 2. Mark up tables
If there are tables in your paper, we recommend tackling these first. It is sometimes necessary to clear and rebuild a page’s tag structure so as to get the table tags correct.
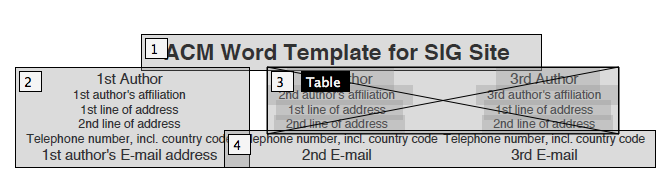
- Go to a page with a table. Check that the table is marked up with a box labelled ‘Table’, and the box correctly covers the table area. In the example below, the text has been wrongly incorporated into the table.

- To correct the tagging, start by drawing a rectangle over the wrongly labelled items by dragging with the mouse. The characters within those items will be faintly highlighted in blue. In the example below, the left column of text is highlighted.

- Click the ‘text’ button in the ‘Touch Up Reading order’ dialog. This tags the selected items as text.
- Repeat for other items incorrectly included in the table.

- Although the table is now bounded correctly, the cells may not be identified accurately. To check this, context-click on the table and select ‘Table Editor’.

This will open a view of the cells in the table. In the example below, the table cells outlined in red and labelled ‘TD’ do not match the actual cells in the table.

- If the cells are incorrect, click outside of the table to close the table editor.
- Draw a rectangle over the table itself by dragging.
- Click the ‘Table’ button in the ‘Touch Up Reading Order’ tool, to re-tag the table.
- Re-open the table editor to check the table cells. Hopefully, they have now been identified correctly, as below.

- If there are still problems, try clearing the tag structure of the whole page. First, SAVE your work so far. You cannot undo any action in this tool.
- Make sure that only a single page is visible in the document window. Partially visible pages will also be affected when you clear the existing page structure.
- Click the ‘Clear Page Structure’ button in the ‘Touch Up Reading Order’ tool.
- Markup the table by dragging over it and clicking the ‘Table’ button in the ‘Touch Up Reading Order’ tool.
- Check the table structure by right-clicking on the table and opening the Table Editor, as in Step 5.
If the table cells are still incorrect, it may be that the table’s visual formatting is preventing the table being correctly recognized.
The cells in the table below, for example, are not well recognized because there are no visible lines between many cells.

- Save your work again!
- Repeat for all tables in the paper.


Consider reformatting your table with stronger borders around the cells.
Step 3. Mark up text and figures
- As you follow these steps, save your work often. You cannot undo changes made with the ‘Touch Up Reading Order’ tool, so the only way to back off is to go back to an earlier saved version.
- Check that all figures are labelled, and the first part of the alternate text description is displayed.

- Check that all text is marked up with a numbered box.
- If you find problems, drag a rectangle over the problem area then click the appropriate button on the ‘Touch Up Reading Order’ tool.
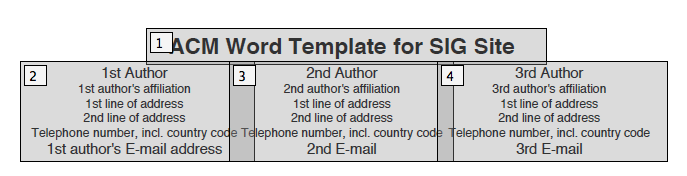
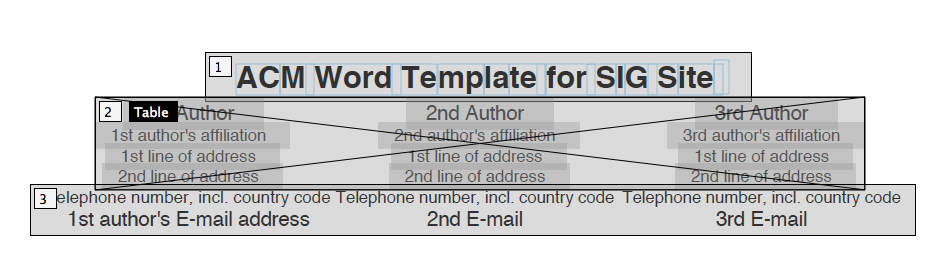
For example, the author list in our paper has been incorrectly identified as a table. To fix this, drag over the first author name and details:

Then select the ‘Text’ button in the ‘Touch Up Reading Order’ tool. The first column will be marked as text.
Repeat for the other two columns.
- If a figure has no alternate text, as illustrated here:

Add alternate text by right-clicking on the figure and selecting ‘Edit Alternate Text’ from the context menu.

Provide a written description that captures the content and function of the image as succinctly as you can. This is what will be spoken to readers who cannot see the figure. You do not need to repeat any information that is already in the document text or figure caption.

Step 4. Mark up headings and formulae
- Draw a rectangle by dragging the mouse over the paper title. The characters of the title will be highlighted faintly in blue.
- Click the ‘Heading 1’ button in the ‘Touch Up Reading order’ dialog. This tags the title as a heading at level 1.
- Repeat steps 1 and 2 for all other headings in the paper, using the Heading 2 to Heading 6 buttons to reflect the nesting level of each heading.

- Do the same for all formulae in the paper, using the ‘Formula’ button in the ‘Touch Up Reading Order’ tool.
- Save your work again!

Step 5. Check reading order and fix problems
- Go to the first page of the document.
- Check that the items are numbered in the same order that you would read them in, when reading through the document.
In the example below, the copyright statement falls within the ‘Page Size’ section.
A better place for it might be after the keywords, before the introduction.

- Open the Order Panel by clicking the ‘Show Order Panel’ button in the ‘Touch Up Reading Order’ tool.

The panel appears on the left of the page window. It shows an ordered list of all the items on each page.

- Find the item in the list that is out of order. Clicking on an item in the list will highlight it on the page.

- Drag the item to the desired position within the list.

- Repeat for all pages in the paper.