
Created by Michele Williams. August 2014.
This page gives step-by-step instructions for adding basic accessibility information to a Word document on a PC, then exporting it to a PDF document intended for ACM. ACM publications are read (and reviewed) by many people; therefore, making your paper accessible will help to promote the equal participation of people with disabilities in science and engineering.
Important: If you are using Word on a Mac, unfortunately there is no equivalent PDF export function that will preserve accessibility features. You’ll need to use a PC to export the document or add accessibility directly to your PDF document.
These instructions use Word 2013 but the information is applicable for earlier versions of Word as well.
Steps
- Use built-in formatting style options
- Set title and language
- Add alternative text to images
- Mark table headers
- Export as accessible PDF
Step 1. Use built-in formatting style options
For proper accessibility information to export to PDF, it is critical to use the tools within Microsoft Word for formatting. That is, do not simply visually mimic font styles or layouts but rather choose the appropriate options in the Word menus.
Fonts
Select the desired font (for instance, “Heading 1” or “Normal”) from the selections that appear automatically within the ACM template using one of the following 2 methods:
(A) On the Home tab, navigate to the Styles ribbon.

-OR-
(B) Open the context menu (right-click with the mouse or use the keyboard command) and select the Styles menu option.

Column Layout
If you need to change the number of columns (primarily with the author information), use the following instructions. (Note the ACM format of 2 columns should remain unchanged but this method should be used in case this is inadvertently changed while editing.)
- Highlight the text
- Open the Page Layout tab
- Select the Columns dropdown option
- Select the desired number of columns

Lists
Microsoft Word will often do this automatically, but ensure any lists (including the references) are numbered or bulleted lists, not simply formatted visually using numbers and spaces. Use one of the following 2 methods to select your list style:
(A) Navigate to the Home tab and Paragraph section.

-OR-
(B) Open the context menu (right-click with the mouse or use the keyboard command) and select the Bullets or Numbering menu option.

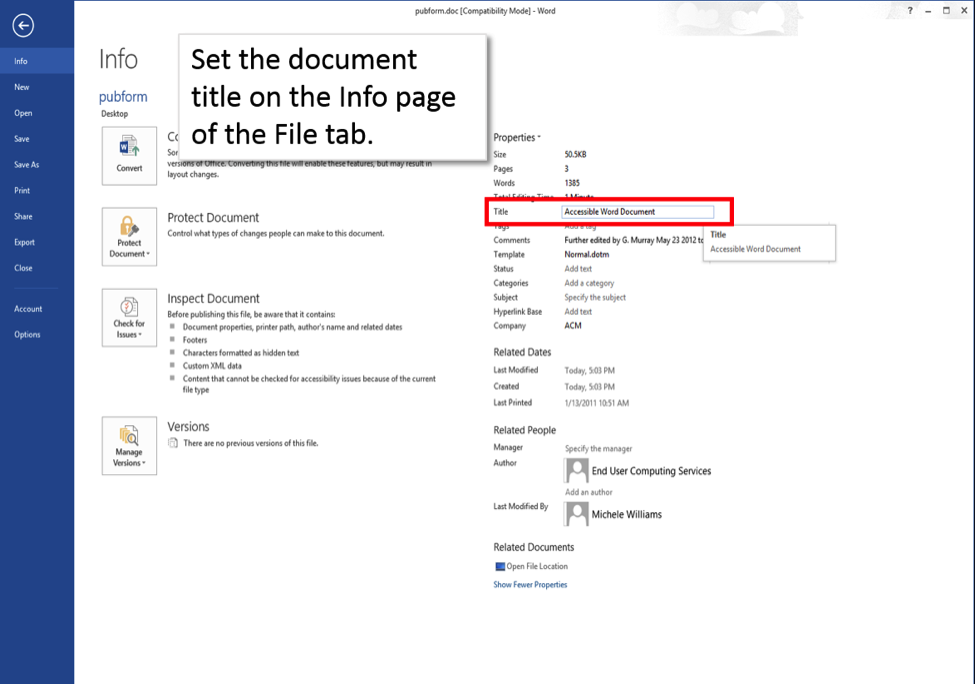
Step 2. Set title and language
Title
- Open the File tab.
- Open the Info page.
- Under the Properties section, navigate to Title
- Type the paper’s title into this field.
Language
- Navigate to the Review tab.
- Select the Language dropdown, then Set Proofing Language.
- Select English in the Language menu pop-up.


Step 3. Add Alternative Text to Images
- Open the context menu (right-click with the mouse or use the keyboard command) and select the Format Picture menu option.
- In the Format Picture menu, navigate to the Layout & Properties tab.
- Open the Alt Text (alternative text) options.
- In the Title and Description fields, provide a written description that captures the content and function of the image as succinctly as you can. This is what will be spoken to readers who cannot see the figure. You do not need to repeat any information that is already in the document text or figure caption.

Step 4. Mark Table Headers
- Highlight the header (title) row (and/or column) in the table.
- Navigate to the Layout ribbon (appears when a table item is selected).
- Check the Header Row or First Column checkboxes as applicable.

Step 5. Export as Accessible PDF
- Navigate to File tab.
- Select Export menu item.
- Select Create PDF/XPS Document.
- In Publish as PDF or XPS, select the Options button.
- In the Options menu, check the menu item ‘Document structure tags for accessibility’.
